Is your blood sugar still high? (despite trying hard to bring it down). e.g. over 100 in the morning. 120 – 200 during the day. A1c still too high (5.8, 5.9, over 6).
It’s not your fault.
Handling diabetes is hard to do on your own.
A. How making just one of these Seven mistakes can keep you diabetic and make things worse:
B. The Most important thing to focus on related to diet and how to avoid dietary mistakes:
C. Why relying on the “standard of care” and medications is a losing battle:
D. The Big mistake most people make when checking their blood sugar:
E. Why trying to fix your blood sugar yourself can be disastrous:
2. The Seven Most Common Blood Sugar Mistakes:
A. Relying too much on meditation and conventional diabetes care:
a. Drugs never fix diabetes:
Drugs can help to bring blood sugar down, but drugs do not treat the root cause of diabetes.
e.g. if you have a fever due to an infection, then Tylenol will help to bring down your fever. However, Tylenol will not kill the bacteria that’s causing your infection.
b. The Standard of Care:
is via drugs.
First-line therapy is metformin and comprehensive lifestyle (including weight management and physical activity).
B. Assuming it’s ALL about diet and exercise:
a. This alone is not enough to fix the root cause of diabetes:
You have an adaptive response and your body will become more efficient in still increasing your blood sugar levels over time, despite your exercise and dietary changes.
You need to challenge your body to do something different so that there’s change.
C. Snacking:
a. Even snacking on healthy foods is not good for you:
Snacking never allows your body to reset its metabolism, to shift from the fed state into the fasting state (when you’re sleeping).
That keeps your insulin levels high and keeps you insulin-resistant.
Humans are Not grazing animals. Our diet tends to be more inline with a carnivorous animal.
We’re meant eat, then stop eating, then eat again.
Snacking leads to overeating, and oftentimes, you don’t snack on healthy foods.
D. Over-consuming energy (carbs + fat):
a. Over-consuming carbs and/or fat:
This puts us into an energy surplus, which basically is what diabetes is, including the keto diet.
We overload the system this way.
Want high protein (protein grams) to low energy (carbs + fat grams) ratio: 1 – 1.5 ~2g.
Check out the PE (protein energy) diet.
Check out the Profast diet.
E. Not checking blood sugar at the right times:
a. Just checking fasting blood sugar first thing in the morning:
check blood sugar around different activities throughout the day.
The Libre 2 – continuous glucose monitoring system is most commonly used.
The Libre 3 – feeds data constantly.
Get a good baseline blood sugar level. Within 30 minutes of waking, first thing in the morning, as soon as you get up – Morning Fasting Baseline test.
Also do a pre-dinner fasting baseline – 4-5 hours between lunch and dinner.
See which one is the lowest. The lowest one is your baseline.
Every deviation above that is elevated blood sugar.
Also check after meals (1 hour after you eat). That will tell you how that food affects your blood sugar.
Your morning fasting blood sugar is more about your metabolic state than what you ate the day before.
F. Trying to use a “one size fits all” approach or chasing trends:
a. There’s no “one size fits all” approach:
There’s no miracle cures to diabetes, i.e. does not fix the root cause of your diabetes. It just keeps your blood sugar level under control.
e.g. new probiotics, plant-based diet, keto-diet, etc.
One method is never going to work for everybody – probably just works for 10%.
You have to be willing to try different things and change your approach if it’s no longer working.
G. Attempting to fix diabetes or blood sugar on your own:
a. Relying on those online events or programs:
It’s too risky. Too many things can go wrong. Most is based on the success of a few, not for every single person.
3. Conclusion:
A comprehensive solution with Guidance, Support and Accountability.
Comprehensive lab evaluation finds and fixes the underlying root cause – executive metabolic lab evaluation.
Detailed metabolic lab panel:
Fasting insulin and C-peptide
Expanded liver enzymes
Advanced inflammatory markers – CRP
Comprehensive thyroid panel
Adiponectin/Leptin ratio – tells you how healthy or sick your fat cells are.
Shift your body’s “set-point” toward thinner and fitter. Address the issues that are causing your body to want to hold onto weight in the first place, e.g., chronic low-grade stress, digestive issues, nutritional deficiency, sleep deprivation, dehydration, mental stress, emotional issues, excessive toxins, etc.
You may not lose weight overnight following this approach, but when you do lose weight, it stays off.
B. Weekly Course Format:
a. Weekly Message:
The first thing you want to do each week is to listen to this weekly message.
This will guide you and explain to you exactly what you need to be focusing on in any given week.
b. Action Steps:
These action steps will build over time. So, whatever we focus on in week 1, we’ll also be doing in week 10, for example, but by then they’ll be automatic habits.
A healthy habit is like an asset that pays dividends forever, and you never have to think about it.
Week by week, we’re going to be creating positive habits that will last a lifetime.
Just do what you can do. You don’t have to be perfect.
c. Visualizations:
Visualization is one of the most powerful tools for creating positive habits and getting your mind and body to work together.
Each week, we’ll focus on a specific visualization that will help you address whatever issues we’re focusing on that week, such as reducing stress or healing your digestion or detoxifying your body, etc.
This is an inside-out approach where we’re using your mind first to help you transform your body, and visualization is so powerful for this in so many ways.
Just press play, listen and relax.
You can even fall asleep while listening, and you’ll still get the positive suggestions.
Commit to listening to a visualization every day.
Listen to the evening visualization as your drift off into a great night’s sleep. While you sleep your mind will be making positive associations with craving healthier foods, being more active, feeling safer and less stressed, and visualizing the fat melting off your body.
d. Additional Resources:
These are completely optional.
The first three are the most important steps to take.
2. Fat Triggers:
These are what cause our bodies to hold onto weight. We will be focusing on a different one each week.
3. Action Steps:
We will be focusing on creating the habit of visualizing every day, and flushing your body out with healthy liquids.
A. Listen to the “Burn FAT Now” visualization first thing in the morning:
B. Drink two glasses of filtered water over the first hour. Add some lemon juice or a teaspoon of apple cider vinegar per glass:
C. Drink a few gulps of water every hour from 10am to 6pm. It can be green juices, super greens, or veggie broths, etc.
The approach is always about adding, so please add the healthy liquids. Start adding some healthy salads into your meal as well.
D. Listen to the evening visualization as you fall asleep.
E. Take it slow and easy. Be gentle and loving with yourself.
A. Evaluation Tests for Both Knees, Left Neck, and Right Shoulder:
B. Exercises:
a. Sleeper Stretch: 2 reps of 30 secs each.
b. Lacrosse Ball for Right Shoulder at the Back:
c. Terminal Knee Extension (Ball on Wall Squeeze): 10 reps of 5 secs each.
i. Using Pillow Behind Knee: @ 0.58s.
2. Second Session – 01/17/23 (Tues):
A. Exercises:
a. Cat Cow:
b. Thread the Needle – Mid Back Mobility Exercise:
3. Third Session – 02/17/23 (Tues):
A. Went through my Strengthening and Stretching Exercises:
a. Standing Up:
i. Gastrocnemius/ Soleus Stretch: Calf extended/Calf flexed. One leg forward, one leg backward.
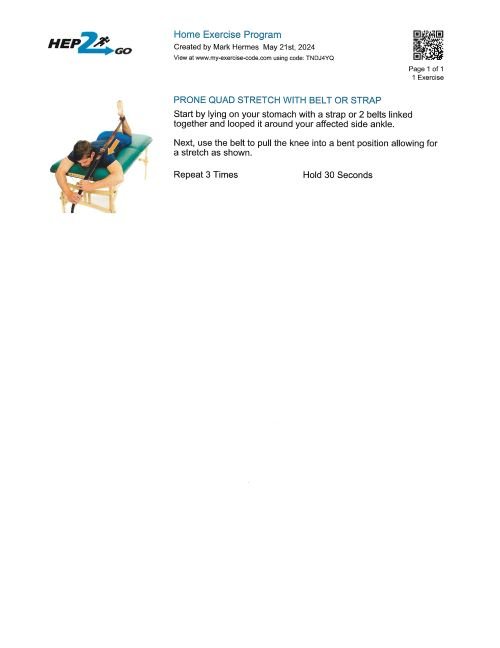
ii. Standing Quad Stretch:
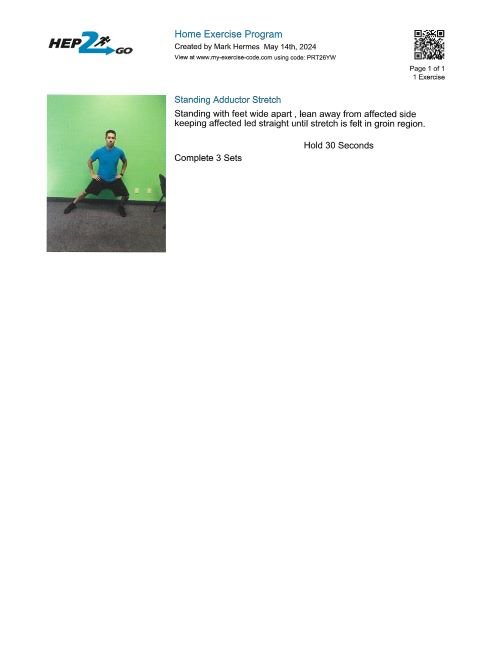
iii. Side lunge: to strengthen (tone) the inner thighs. (or Ball Squeeze Bridges while lying down).
iv. Standing Glute Stretch: Stretching of hip, glutes, and to improve balance.
v. Hamstring Stretch with foot on an elevated surface:
vi. Shoulder Cross Body Stretch:
vii. Tricep Stretch:
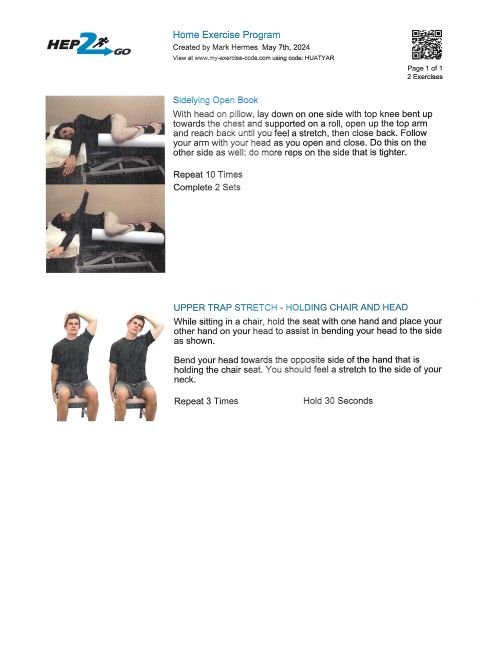
xiii. Upper Trapezius Stretch: for my right shoulder pain (3 stretches for this).
ix. Strap Internal Rotation Stretch: Right hand behind back, strap over left shoulder pulling right hand upwards.
x. Corner Pec Stretch: for my right shoulder pain.
b. Lying Down:
i. Sleeper Stretch (Session 2):
ii. Terminal Knee Extension (Session 2):
iii. Cat Cow (Session 2):
iv. Thread the Needle (Session 2):
v. Lacrosse Ball (Session 2):
vi. Ball Squeeze Bridges: to strengthen (tone) the inner thighs. (or Side lunge while standing up). Squeeze the ball first, then lift up and do the bridge.
vii. Foam Rolling the Hamstring / Calf / IT Band:
4. Fourth Session (03/02/23):
Hamstring Foam Roller
Hamstring Strap
Split Squats
5. Fifth Session (03/09/23):
Incline Press
3-way Biceps Curls (Palm Up, Palm Down, and Hammer).
I have been doing sitting squats for the past few months. I just increased it to 7 sets of 10 two weeks ago and plan on increasing it to an additional set of 10 each month, until I get to 10 sets of 10. I’ve noticed recently that even though my weight is the same, but my butt is firmer and bigger now. π Someone also just recently complimented me and said that I have a sexy butt! π Remember! Butt goes back first, then bend your knees. Chin goes straight.
ii. Find a focal point, then close your eyes and try to visualize that target.
iii. Balance for 30 seconds.
Two reps, twice a day.
c. Drawing Diagonals with Ball:
i. Stand with feet apart.
ii. Hold an object with both hands and slowly lift it in a diagonal pattern; up and across your right shoulder.
iii. Slowly lower it down and across your body diagonally until it is outside of your left knee.
iv. Repeat 6 times.
v. Perform in the opposite direction.
Six reps on each side, twice a day.
3. 05/24/22 (Tues):
a. Aerobic Exercise:
Try increasing intensity by walking faster (consider 1 – 1.3 mph to start and if going well then increase speed), but OK to go for a shorter amount of time.
I increased my settings to 1.0 for 45mins instead of 0.6 for 60 mins. I then stretch for 20mins afterwards.
Another option is to warm up at your normal speed and then walk faster for 10 minutes.
Other options: exercise bike, elliptical, etc.
b. PT Exercises – 2 -3x/day:
i. Marching – added today
ii. Heel – toe walking ~ if too wobbly, then OK to widen your feet slightly.
iii. Standing eyes closed (same as before).
iv. Clock stepping
OK to just do 3 of these exercises for each session.
c. Optional:
i. “Clock yourself” app.
4. 06/28/22 (Tues):
a. Slow Forward March ~ More Advanced:
i. Shoes off (preferable).
ii. Slowly shift weight onto left leg and raise right knee up toward ceiling. Hold for 3 – 5 seconds.
iii. Lower right leg and take a step forward, then raise left knee up and hold for 3 – 5 seconds.
iv. Repeat while marching ahead 10 – 20 feet.
v. Repeat 1 – 2 times, for 2 – 3 times a day.
vi. Repeat backwards.
vii. To Progress: March backwards & forwards.
b. Single Leg Balance Prep:
i. Stand in the corner for safety and place a 4 – 8 inch phone book/footstool on the floor in front of you.
ii. Lightly place one foot on top of the book and close your eyes.
iii. Try a distraction challenge while keeping your balance.
– Count back by 7’s.
– Name cities/names by letter.
– Name the steps of a recipe.
iv. Repeat 1 – 2 times for each leg.
v. To progress: Rest only toes on the book/stool.
c. Clock Step On Uneven Surface:
i. Stand next to a counter or table. Stand on an uneven surface (foam or towels). Imagine a star pattern or clock on the floor.
ii. Step your right foot forward to the 12 o’clock position, then back to the center. Then step out to 1 or 2 o’clock and back to the center. Repeat to 2 o’clock, 5 o’clock, and 6 o’clock.
iii. Then perform this on the other side with the opposite foot. You may need to turn so the counter is on the side of the leg that isn’t moving.
iv. To progress: Instead of shifting your weight into the stepping foot, just lightly tap your heel or toe at each of the numbers and back to the center.
v. Repeat 1 – 2 times through the matrix on each side. Do this 2 – 3 times a day.
d. Braiding / Carioca:
i. Step your right foot over your left.
ii. Bring your left foot next to the right foot, so they are side-by-side.
iii. Step the right foot behind the left, then bring the left foot next to it, so they are side-by-side again. Do this for ____ feet.
iv. Go the opposite direction (left foot over right, left behind right).
v. Repeat ___ times. Do this ___ times per day.
B. Occupational Therapy:
1. 03/17/22 (Thurs):
a. Seated Weight Shifts ~ Forward to Back with a Letter Chart:
i. Keep your hands relaxed by your sides.
One rep, twice a day.
2. 05/09/22 (Mon):
a. Seated Weight Shifts ~ Front to Back with Picture Flip:
b. Horizontal Saccades with Picture Flip ~ Cross Midline Reach:
3. 05/23/22 (Mon):
a. Long Brock String:
i. Begin in either sitting/standing (I practiced using sitting).
ii. String Set Up:
Attach a string with beads to a door handle or other object that does not move.
Hold the other end to your nose.
The string should be straight on from the nose, or have a slight downward angle.
The close bead should not be double or blurry when you look at it. If it is, then move the bead farther away from your nose.
iii. Exercise:
Place 3 beads on the string. They should be positioned on the blue tape (14″, 23″, and 32″ from the nose).
1 rep = Start by looking at the furthest bead to your nose, and progress down the string, holding each bead for 10 seconds.
The bead that is being focused on should be single and everything else should be doubled creating an “X”. The “X” must cross at the bead you’re looking at.
Repeat 5 reps for 3 times a day.
iv. To Progress:
– Bring the beads closer to each other.
Blue stays in the same spot.
Red and Green move closer to the blue.
– Move the beads closer to your nose.
Slowly inch them closer ~ as tolerated.
4. 06/15/22 (Mon):
a. Brock String:
i. Begin in either sitting/standing (I practiced using sitting).
ii. String Set Up:
Attach a string with beads to a door handle or other object that does not move.
Hold the other end to your nose.
The string should be straight on from the nose or have a slight downward angle.
The close bead should not be double or blurry when you look at it. If it is, then move the bead farther away from your nose.
iii. Exercise:
Place 5 beads on the string. They should be positioned on the blue tape (closet bead on the black mark).
1 rep = Start by looking at the furthest bead to your nose, and progress down the string, holding each bead for 5 – 10 seconds, then back out.
The bead that is being focused on should be single and everything else should be doubled creating an “X”. The “X” must cross at the bead you’re looking at.
Repeat 8 – 10 reps for 2 – 3 times a day.
iv. To Progress:
– Turn your head side-to-side slowly while maintaining the x.
– Nod your head up and down while maintaining the x.
b. Binocular Tracking:
i. Hold your finger 12 – 18 inches away from you at eye level.
ii. Slowly move your right thumb up and down in front of you, keeping your eyes focused on it.
iii. Don’t move your head.
iv. Repeat 10 reps 3 times a day.
a. Square Saccades:
i. Begin standing.
ii. Place 2 blocks of letters on the wall.
iii. Read the first letter from the first chart, then the first letter from the second chart.
iv. Keep your head still and move your eyes only.
v. Read the second letter from each chart, and then the third, etc.
vi. Be creative, change the patterns once side to side gets easy!
vii. Repeat 3 times a day.
5. 07/11/22 (Mon):
a. Visual Rest Breaks:
The 20-20-20 Rule:
For every 20 mins of computer work, look about 20 ft away for about 20 sec. In the 20 sec check in with yourself to see if your symptoms went up and if you need a longer break.
Set a timer.
Palming:
Rub hands together so they become warm.
Press the heel of the palm on the lower orbit of the eye.
Place the rest of the hand cupped around the orbit of the eye (never press on the eyeball).
Place the elbow on a solid surface and allow the weight of the head to press through the hand.
Focus on deep breathing for 2 minutes.
Other ways to give your eyes a break:
Go for a walk.
Complete a light chore.
Listen to music.
b. Septum Card – Near Targets:
1. Hold the card vertically (up and down), close to your eyes. You should see the lines of letters on each side.
2. Focus your eyes on the closest pair of letters – the set of letters closest to you from each side of the card.
3. Fuse the pair of letters together so they appear to be one letter.
4. Hold the letters together for 5 – 10 seconds (this is the goal).
Fuse together the closest “O”, middle “H”, and/or furthest “O”.
Spend about 5 minutes per day (doesn’t have to be all at once). Take breaks.
* The letter that you are focusing on should be single. The other letters in the row should be double.
b. Brock String:
Begin in either sitting or standing.
a. String Set Up:
i. Attach your brock string to a door handle or other object that does not move.
ii. Hold the other end of your nose.
iii. The string should be straight on from your nose, or have a slight downward angle.
b. Place 5 beads on string. They should be positioned on the blue tape.
c. Start by looking at the furthest bead. Jump your eyes to a random bead. Hold each bead for 2 – 3 seconds.
d. The bead that is being focused on should be single and everything else should be double, creating an “X”.
e. Repeat 3 sets of 10 beads repetition; 1 – 2 times a day.
f. To progress: Jump your eyes to random beads not in order.
6. 08/22/22 (Mon):
a. Brock String:
Begin in either sitting or standing.
a. String Set Up:
i. Attach your brock string to a door handle or other object that does not move.
ii. Hold the other end of your nose.
iii. The string should be straight on from your nose or have a slight downward angle.
b. Place 5 beads on the string. They should be positioned with the closest bead at 3.5″ from your nose.
c. Start by looking at the furthest bead. Progress down the string by jumping your eyes from one bead to the next. Hold each bead for 3 – 10 seconds.
d. The bead that is being focused on should be single and everything else should be double, creating an “X”.
e. Repeat 3 sets of 10 beads repetition; 1 – 2 times a day.
f. To progress:
i. Move the closest bead closer to your nose (the read bead should stay put).
ii. Bring the beads closer to each other. Move them to about 5″ apart from each other.
iii. Jump your eyes to random beads not in order.
b. A Pushups:
Focus on the “A” on the popsicle stick at arm’s length.
Bring it closer to your nose, and stop when the A doubles.
Move it further away just a little bit until the A becomes single again, and hold it for 5 seconds.
Take a quick break – look off into the distance.
Start with ~ 5 reps, gradually increasing to 10.
The 20-20-20 Rule:
For every 20 mins of computer work, look about 20 ft away for about 20 sec. In the 20 sec check in with yourself to see if your symptoms went up and if you need a longer break.
Set a timer.
Palming:
Rub hands together so they become warm.
Press the heel of the palm on the lower orbit of the eye.
Place the rest of the hand cupped around the orbit of the eye (never press on the eyeball).
Place the elbow on a solid surface and allow the weight of the head to press through the hand.
Focus on deep breathing for 2 minutes.
Other ways to give your eyes a break:
Go for a walk.
Complete a light chore.
Listen to music.
c. Reading:
Start by reading 1 – 2 pages.
Gradually add a page as your tolerance improves.
d. Septum Card:
Continue
e. Up-Down Tracking:
Do it in front of a busy background.
C. Omnivision – Syntonic Light Therapy:
1. 05/26/22 (Thurs):
a. Green Filter:
1. Use “full spectrum” light bulb or natural daylight bulb. 40 watt bulb. Sit about 16″ away from the light source.
2. Play soothing music.
3. Close your eyes until you see black.
4. Turn light on. Set the timer for 30 seconds and look at the light source with your Mu/Upsilon glasses on.
5. Turn light off. Remove your glasses. Close your eyes and note if you see any color. This is your after color. Note your after color on the tracking sheet.
6. Do 1 time(s) a day.
7. Do five days in a row followed by a two day break.
8. Continue treatment for 9 weeks.
9. Return for a visual fields study in 9 weeks after light therapy has been completed.
10. If doing well after a week or two, with no side effects, then can increase time by 30 seconds, up to a 2 minute max.
1. Self-Care Program for Temporo-Mandibular Disorders (TMD):
People with jaw problems can have problems in their TMJ(s) and/or the muscles of their jaw.
Once a joint or muscle is strained, it can be easily reinjured.
Total relaxation of the jaw joint and surrounding muscles is difficult. However, holding the muscles and joints in a relaxed position is very manageable with practice.
The following suggestions should help:
A. Ice or Heat Pack:
a. Apply moist heat for 15 – 20 minutes, two to four times each day to the painful area.
b. Also try using ice wrapped in a very thin cloth (or no cloth) for 5 – 10 minutes, two to four times each day. The ice may initially give you a “burning” sensation, this is normal. Keep the ice on the painful area only until you feel some numbness, and then remove it.
Heat or ice can reduce joint or muscle pains and relaxes the muscles.
c. You may also find that cold followed with heat may be useful. Experiment.
B. Eat a Pain-Free diet:
a. Avoid hard foods.
b. Avoid chewy foods.
c. Cut food into small pieces.
d. Chew with your back teeth rather than biting with your front teeth.
e. Do not stay on a soft diet for too long, and periodically increase the hardness / chewiness of your diet as tolerated.
C. Chew your food on both sides at the same time to reduce strain on one side.
D. Tongue up, Teeth apart, and Jaw muscles relaxed.
a. The teeth should never be touching/resting together except occasionally they tough lightly with swallowing.
b. Closely monitor your jaw positions.
E. Avoid too much caffeine:
Caffeine is “muscle tensing” drug and can make your muscles feel tighter.
F. Avoid oral habits that put strain on the jaw muscles and joints.
a. e.g. teeth clenching, teeth grinding, touching or holding the teeth gently together, biting cheeks / lips, pushing your tongue against your teeth, or jaw muscle tensing.
b. Avoid biting on objects like pens or pencils.
c. Do not chew gum.
G. Avoid resting your jaw on your hand.
H. Avoid activities which involve wide opening of the jaw such as yawning.
a. Put your hand under your jaw to limit the jaw opening.
I. Avoid stomach sleeping since this puts strain on the jaw and neck muscles.
a. It’s best to sleep on your back.
J. Use anti-inflammatory and pain reducing medications as necessary.
K. Calcium is very important for the healing and the health of your TMJ and jaw muscles.
a. Take up to 1200mg of Calcium supplement per day.
2. Self-Treatment:
A. Stretches and Exercises: Once per day; 5 – 10 minutes total.
a. Use your thumbs to gently stroke underneath your jaw.
b. Use your index and middle fingers to gently stroke the tight area in your temples, and around your ears in a circular motion.
c. Use your index and middle fingers to gently stroke the side of your face in a gliding motion. Always pull away from your jaw to avoid compressing the joint.
B. Self-Release:
a. Intra-orally: hold for 30 – 60 seconds; a few times per day.
b. Suboccipital Release:
i. With two tennis balls.
ii. Relax onto the balls. Do not press head down into floor.
Rotator cuff stretches are great for the rotator cuff muscles (supraspinatus, infraspinatus, teres minor, and subscapularis), as well as the muscles around the shoulder that connect to the scapula and can cause shoulder pain and rotator cuff pain.
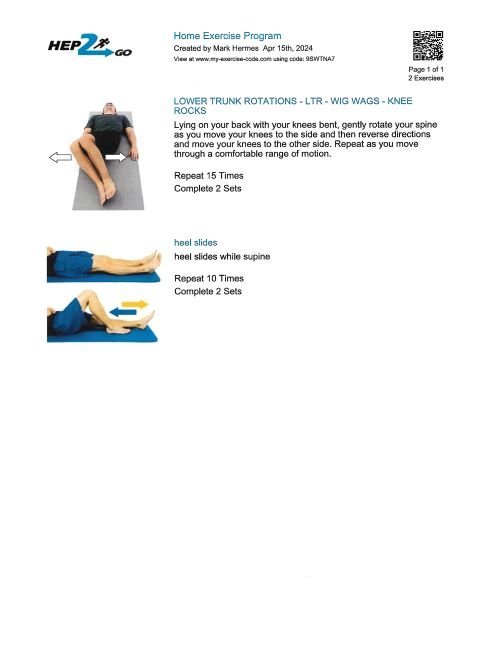
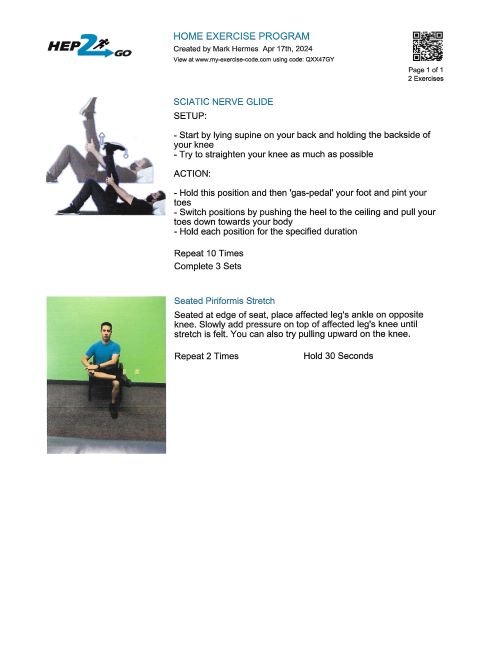
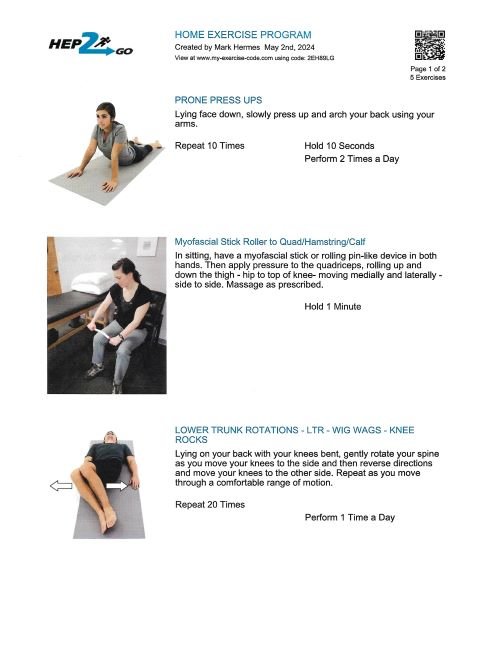
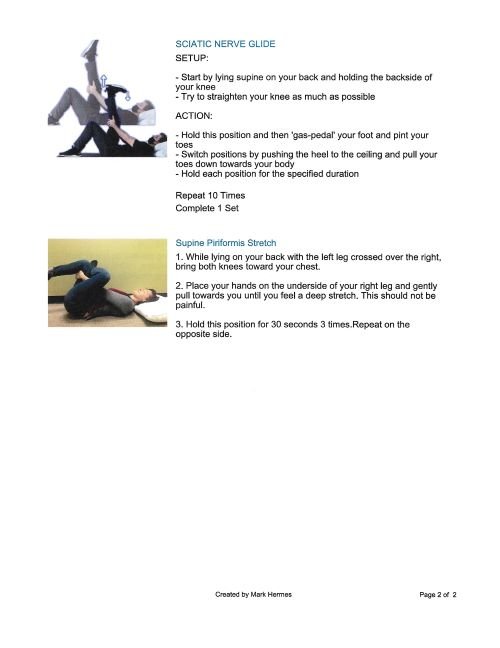
Piriformis syndrome is literally a pain in the butt. The sciatic nerve runs underneath the piriformis muscle. When it gets tight and irritated, it often presses on the sciatic nerve causing symptoms of sciatica.